When I was starting Cocos2d-x, I found it very very hard to find supporting documentation and tutorials for beginners. There are some but most of them are outdated and/or unapplaicable to version 2.0.So I decided to make my own tutorial for the latest version of Cocos2d-x and Android SDK. Now, let's get started. We need to set up a few things first before we can actually work on a cross-platform mobile game.
The COCOS2D-X Library
In order for us to make a cross-platform game, we need to get the Cocos2d-x library and install in your Mac.
1. Download the library here. The link will take you directly to the official Cocos2d-x download, so just save the ZIP file when you are prompted.
2. Unpack the ZIP file to a location of your choice. I recommend putting it in an easily accessible place. Rename it as you wish but it would be better to just leave it be once you unpacked it. For this tutorial, we will assume the path to which the library is located would be /Users/LGDev/Documents/cocos2d-x and I’ll refer to this as the Cocos2d-x Root
3.Now open up the Terminal and change the directory to the Cocos2d-x Root using the cd command. Like so:
cd /Users/LGDev/Documents/cocos2d-x
4. When inside the Cocos2d-x Root run the install-templates-xcode.sh using the sudo command, like so:
sudo ./install-templates-xcode.sh -u
You might be asked for a password so just enter your password if you are asked.
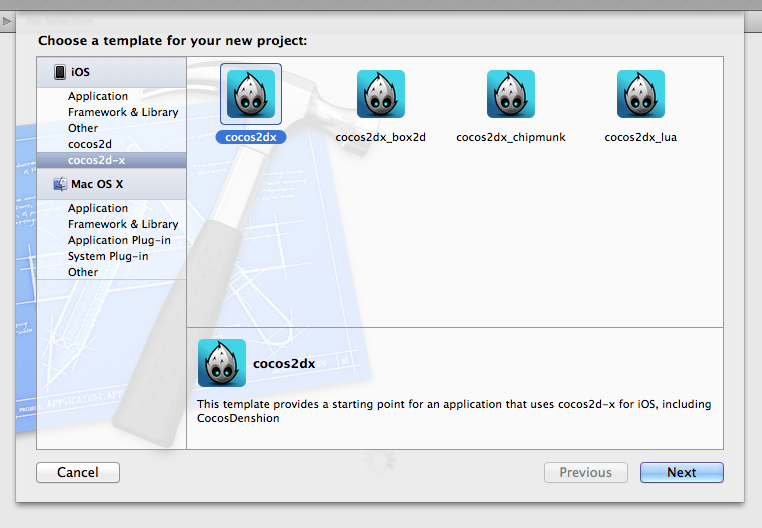
5. Once that is done, open up Xcode and create a new project. On the left side of the dialog box, you will find cocos2d-x listed under iOS. Select it and you will are all the templates installed for cocos2d-x. Choose cocos2dx and click Next. Xcode will now make your new cocos2d-x project.
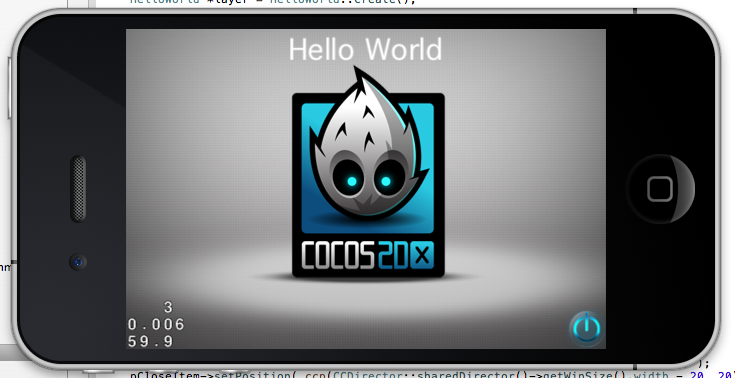
6. If you want, try to run it and you will see the Hello World application pop up on the screen. You might also go back to the terminal and export a global variable that will define the Cocos2d-x Root. Like so:
export COCOS2DX_ROOT="/Users/LGDev/Documents/cocos2d-x"
This is needed because we're gonna need this variable later on. Once that is done, the Cocos2d-x library is now installed on your machine. The next step is to set up your machine for Android development. To do this, we must install the Android SDK and NDK on your machine, as well as the IDE we're going to use, which is Eclipse.
The Android SDK and NDK
Before proceeding, check if your JDK is installed and is greater than 1.6.0. Open up the Terminal and type in:
java -version
You should see something like this:
java version "1.6.0_33"
Java(TM) SE Runtime Environment (build 1.6.0_33-b03-424-11M3720)
Java HotSpot(TM) 64-Bit Server VM (build 20.8-b03-424, mixed mode)
Once you’ve checked it, you can start setting up your Mac for Android Development.
2. Once the download has been completed, unpack it on a safe place. For this tutorial, we will assume our SDK is on /Users/LGDev/Documents/AndroidSDK and I’ll refer to this as the Android SDK Root.
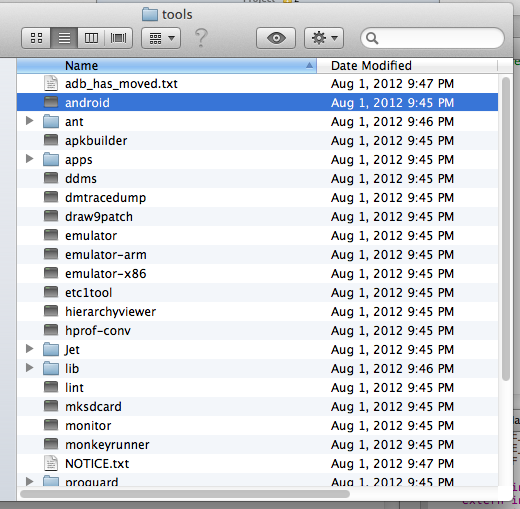
3. Go to the Android SDK Root, tools folder, and run the android executable file. This will open up the Android SDK and the Android Manager. Alternatively, you can run the android executable file via the Terminal.
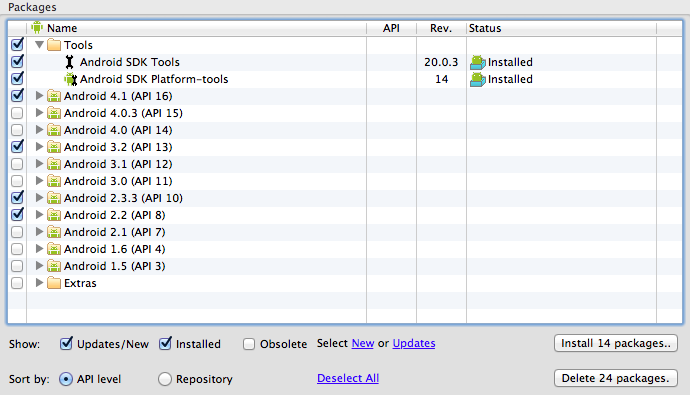
4. On the Android Manager, check Tools and all the Android API you want to work on. You might also want to check Extras. Once that is done, click Install Packages... and you will be presented by a dialog screen. Click Accept All and then Install to start the installation. Wait for the installation to finish.
5. Next, get the Android NDK from here. Download the Mac version of the NDK. Once the download is done, unpack the NDK and put it in an accessible place, preferably in the same folder as the Android SDK Root. For this tutorial, we will assume the Android NDK is on /Users/LGDev/Documents/AndroidNDK and I’ll refer to this as the Android NDK Root.
6. Download Eclipse from here. The Classic Version is the most recommended one. I am using Helios but you can use the latest one (Juno as of writing).
7. Unpack Eclipse and run it. You might want to put it on the Desktop or on the Dock for easier access.
8. On Eclipse, go to Help > Install New Software... and you will see a new window pop up.
9. We’ll first set up Eclipse so that it can read C++ codes. On the Install window, on the Work With box, select your Eclipse version.
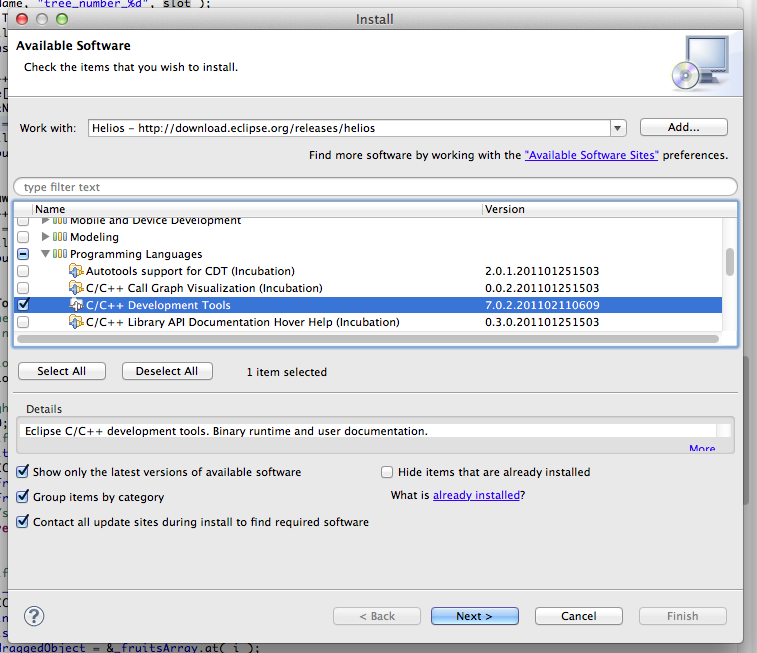
10. Wait for the list to be populated and select Programming Languages > C/C++ Development Tools and click Next.
11. Follow the process until it is done. You will have to restart Eclipse once the plugins are installed for it to take effect. Do so and proceed.
12. Go back to Help > Install New Software... and you will be presented back to the Install window.
13. This time, we will install Android plugins. Click Add and put https://dl-ssl.google.com/android/eclipse/ on the Location box. Give it a distinct name like Android for Eclipse.
14. Wait for the list to be populated and click Select All. Click Next and follow the instructions in the wizard to install the Android plugins. You will have to restart Eclipse afterwards. Do so and proceed.
15. We’re now ready to start developing cross-platform games using Cocos2dx. However, we need to do a bit of a tweak just so that everything goes smoothly. Open up the terminal and enter the following commands:
export ANDROID_NDK_ROOT="/Users/LGDev/Documents/AndroidNDK"
export ANDROID_SDK_ROOT="/Users/LGDev/Documents/AndroidSDK"
export NDK_ROOT="/Users/LGDev/Documents/AndroidNDK"
Don’t forget to change the values to your Android SDK Root and Android NDK Root. We will need these variables later on.
We now have set up your Mac for cross-platform development using Cocos2dx. The next step is creating a cross-platform project that synchronizes on both Xcode and Eclipse, with Cocos2dx of course.
I hope you found this tutorial useful. I will link this to the next step Creating a cross-platform project on Eclipse and Xcode. Stay tuned!
Hey there!
ReplyDeleteAwesome tutorial, had troubles with the last 3 I tried. But yours is perfect!
Is there a link to the next step of this?
Thanks!
The next step would be this: http://lancedev.blogspot.com/2012/09/creating-cross-platform-project-on.html
ReplyDeleteBut I've learned an easier way to create projects for multiple platforms and that is to copy-paste the sample HelloWorld project and edit the names and directories and stuff.
This is a good resource: http://paralaxer.com/cocos2d-x-project-setup/
Hey i kept trying to type in those stuff for the NDK in the terminal,
ReplyDeleteBut it never works
How?
You have to edit your bash profile for it to work. Type in:
Deletecd ~
and then
nano .bash_profile
After that, copy and paste the export commands in the window that appears. Close and save the file (CTRL+X and then Y) and restart the terminal. Type in "echo $NDK_ROOT" and it should print out the path of your NDK. If it does, then you are good to go.
Hey thanks, i manage to do what the tutorials show after the comment.
DeleteThanks, great tutorial btw
Thank you too. :)
DeleteIndeed nice tutorial & i also setup my environment for android ...now i want to run my existed cocos2dx c++ project ,, how can i run it on eclipse on android ???? any help ?
ReplyDelete